I, like most of you, am not a professional photographer. The information I am supplying here is after researching this subject. If you are looking for specific information regarding camera choices, film choices and technical information you will want to consult a professional photographer.
Getting good results taking pictures of your Classic is a combination of several factors which we will discuss in this article. Here are a few to consider: prepping your Classic, choosing your background, positioning your Classic, lighting considerations, and how to focus your shot. I will assume most of you use a 35mm camera format. There are other options available and I'll try to explain these in plain English as we go along. Let's get started. Prepping Your Classic - I know this doesn't need to be said, but you should make sure your Classic is thoroughly clean, including the tires and wheels. All chrome and metal surfaces should be polished. You might want to keep some cleaning supplies on hand for those last minute touch-ups. Choosing Your Background - This step is very important and a lot of thought should be given to it. The background for your Classic should be picked so that it enhances your car. It shouldn't be so distracting that is takes your viewer's eyes away from the focus of your photograph....your Classic. This is also a good time to consider how light effects this location. I'll explain more about lighting in another section. You'll also need some contrast in your shot to make your Classic stand out. For example, if you have a light colored paint scheme on your classic you'd want to try to pick a spot with a darker background. If your classic has a dark paint scheme, choose a background with light areas. Make sure whatever background you choose doesn't fight for attention with your Classic. Positioning Your Classic - There are many ways for you to choose to display your Classic. I personally like what is referred to as a 3/4 angle shot. This simply means that you will photograph your Classic from an angle so that you'll see the side of the car and either the front or rear of it at the same time. This allows the source of lighting to be on both surfaces of the vehicle facing the camera.
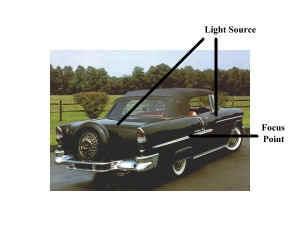
(Click on image to see larger version) A point that is easily overlooked and not noticed until you develop the film is taking a self portrait of yourself in your Classic's shiny surfaces. By positioning yourself far enough away from your classic your shadow or reflection should not enter the picture. If your Classic is a hardtop or sedan, roll the windows down to help cut down on reflections. If you happen to be shooting a convertible, consider taking shots with the top in both the up and down positions. When photographing your Classic's engine compartment, interior or trunk compartment, consider using a flash or strobe to fill in shadow areas caused by the sun. Lighting Considerations - Lighting plays an important role when deciding how to photograph your classic. Proper lighting can enhance the mood and feel of your photograph, while poor lighting will detract from it. When shooting your Classic consider setting up so that the light source comes from the side rather than above and directly behind you. (Never shoot towards the sun.) Shooting with the light source directly behind you tends to eliminate the highlights and shadows on an object, this seems to flatten out a scene. What is preferred is "sidelighting' that has the light source highlights both surfaces of the classic that are facing the camera. This gives your Classic form and definition while letting the bright colors shine that are so appealing.
Focusing Your Shot - As I stated earlier I'm assuming you're using a 35mm camera. If you are using a model that allows setting the 'F" stops manually a range of F-11 to F-16 seems to work well in most cases. You may want to experiment to get the right setting for your location. Whether manually setting or auto setting the camera (as some newer models do) what we want to accomplish is to get a good focus field. This means we want to keep the entire car from front to back in focus. You can accomplish this by using a focal point about 1/3 of the way back on the car (when facing the front this point would be just behind the front wheel-well opening or if shooting from the rear, about the center of the rear wheel). Film Formats - The 35mm film format would be the minimum
size I would recommend for photographing your Classic. Remember That's about it for now..go out and shoot a few Classics.
|